Sunday, 5 August 2012

Enable Multiple Users on your Jelly Bean Device


If you have been running Jelly Bean on your device for some time, you must be greatly surprised with the features it has to offer you. Some features are just visible to the end-users like you and me, while some have to be discovered by playing with your device for a few hours. A news comes out from the XDA Portal that you can now enable multiple users on your Jelly Bean device. That’s a great thing as it will let you hand-over your phone to your friends without worrying that they’ll mess up with your data. Follow the procedure given below and you will end up having multiple users on your Jelly Bean Device.


I. Before You Begin:

1. You must have rooted your device before doing this procedure.

2. You must be running on the Android Jelly Bean.


II. Downloading Required Files:

1. Download the Terminal Emulator App from here. (Google Play Link)


III. Enabling Multiple Users on your Jelly Bean Device:

1. Download and install the Terminal Emulator App on your device. The download link is provided above.

2. After the app is installed on your device, just open it up from the App Drawer.

3. Once the app has been launched, type in the following commands:

su
pm create-user test

4. The above commands will create a new user account on your device named test.

5. To change your profile to the newly created account, just press the Power button for a few seconds and you will see the Power menu.
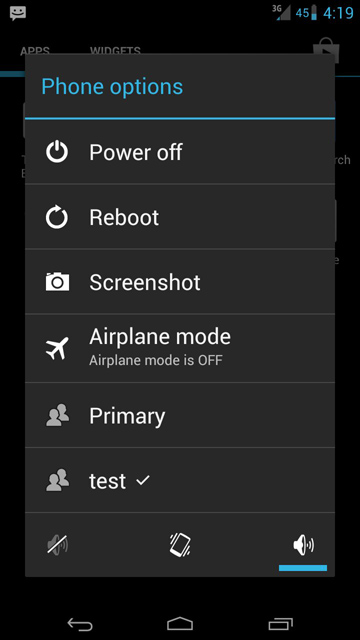

[ Tap on test ]


6. Tap on the name of the new account you created, i.e, test, and you will be taken to the fresh homescreen for that particular user.


You can now add widgets to your homescreen, change wallpaper and do all the phone tasks. If you ever need to remove the second user account you created, just follow the following steps.


IV. Removing User Account on your Jelly Bean Device:

1. Launch the Terminal Emulator App from the Menu of your device.

2. Issue the following commands in the app:

su
pm remove-user 1

3. The second account will be deleted from your device.


You now have the ability to create multiple user accounts on your JB Device just like the Windows PCs.

Friday, 3 August 2012

10 Great Spots to Find a WiFi Hot Spot

As prices continue to drop on E-readers, tablets, iPhones, and other electronic devices that allow people to access the internet with more ease than a traditional laptop or computer, more and more people are buying them.  The influx in people owning these devices creates a need for places where you can use them, however many places don’t offer free WiFi.  And while you could buy the devices that allow you to access the Internet, they can end up being pretty costly.  So now that you have your new tablet how do you find out who offers free WiFi hot spots?  Check out the following 10 great spots to find a WiFi Hot Spot.

  1. wififreespot.com: This is a great site.  It breaks down the search for WiFi into easy searches such as restaurants and retails establishments versus hotels and other types of businesses.  They will even tell you which sites will require that you create a “free” login in order to access the WiFi.  Are you traveling to Europe?  You can use this site to find Hot Spots in Europe as well.

  2. wifidirectory.com: Traveling in the U.S., Canada, Australia, Asia, or the Middle East?  This site is sponsored by netstumbler.com and can find Hot Spots in these countries and many more.  This site also offers stories about new technology in regards to electronic devices, wireless transfers, and more.

  3. jiwire.com: I would recommend this site for world travelers.  You start with a map of the world and you can click on whatever country you are traveling to.  However, once you click on that country, or state as the case may be, then you have to keep clicking and narrowing your search down until finally you get a map of either blue or green bubbles.  The blue bubbles represent those Hot Spots where you have to pay to access the Internet and the green bubbles are the free Hot Spots.  You have to pass your mouse over the bubbles in order to see where they are.  A word of warning: if you have several bubbles in the same area it can be difficult to get the correct bubble to come up.  Not very user friendly, but it would work in a pinch.

  4. http://www.boingo.com/:  A very different site, but still useful for those that travel and need to be able to use their laptops or tablets on the go.  Boingo offers a paid service to provide Hot Spots worldwide and now even on airplanes.  It’s inexpensive compared to a portable 3G device.  Once you are a member you can use the service and search on the site for free for Boingo Hot Spots worldwide.

  5. openwifispots.com: This is a very user-friendly site, but it’s limited in the Hot Spots it has.  If you are going to be in a major city like Dallas you can pull up a list of Hot Spots as long as your arm, however if you are in a suburb outside of the city it may come up empty.  I would not recommend this site to those in small cities.

  6. http://www.att.com/gen/general?pid=13540: AT&T sponsors many of the free hot spots and therefore it makes sense that they would have a good listing.  It’s a search tool that is easy to use.  Simply type in your zip code or city and state and it will pull up the free WiFi hot spots.  These may just be the AT&T hot spots, but still a useful tool.

  7. wefi.com: More labor intensive than others, this tool requires you to download a program to search for WiFi Hot Spots.  Just be aware that the database is not very complete when you’re using it.  The nice thing about the program is that you can download it to your device and it will automatically connect you to a free WiFi Hot Spot that has the strongest signal.  This saves you a step, but it also doesn’t allow you to check out the site before you connect to it.

  8. http://www.wi-fihotspotlist.com/: The WiFi hot spot list is very user friendly.  All you have to do is type in your zip code and it will pull up in writing where the free hot spot is and what the address is.  It also will tell you what network it is.  Their list however is far from complete.  Other sites offer a map of the area so you can get right to it.  If you are local and know where the streets are or if you can program the address into your GPS you are golden, but if you are in new area and aren’t using a GPS then the sites with the map might be a better choice for you.

  9. http://hotspotr.com/: Hotspotr is a great site and very easy to use.  Type in your zip code and it will pull up a map with all of the hot spots marked.  The lists are generally very comprehensive.  It’s very easy to follow and as you roll your mouse over each point it will tell you where it is.  A great choice for finding a hot spot in your area.

  10. content.hotspot.t-mobile.com: T-Mobile is all about 3G with their phones now, but they also offer a service you can pay for that will give you WiFi in many places around the country and the world.  The price tag isn’t too bad and it allows you to access a lot of Hot Spots in cafes and airports around the country.  Definitely worth checking into if you have a T-mobile phone anyway or even if you are just looking for an additional service to help you get connected.
To read the original article click here !!!


Thursday, 26 July 2012

Install Google Ears on Android ICS Device


With the launch of the Android’s latest iteration, Jelly Bean, a bunch of new apps were revealed in the function which was held in USA about a week ago. One of the app which seemed to be interesting to users was Google Ears. As the name implies, the app listens to the sound playing around it and tells you more info about that track. If you’ve used Shazam app, this app works in the same way. If you have an Android ICS device and want to test out this app, you can follow the procedure given below. It explains all the steps involved in installing the Google Ears app on your device. Here you go:


I. Before You Begin:

1. You must be running on Android ICS or Jelly Bean.


II. Downloading Required Files:

1. Download the Google Ears App from here. (Link is there in the first post, titled as No Root Devices)

2. Download the Astro File Manager App from here. (Google Play Link)


III. Installing Google Ears App on your ICS Device:

1. Download and install the Astro File Manager app on your smartphone.

2. Connect your phone to your PC using the USB cable.

3. Transfer the Google Ears APK file to your phone’s SD card folder.

4. Disconnect your phone from the PC after the file has successfully been transferred to your phone.

5. Go to Menu>>Settings>>Applications and enable Unknown sources.

6. Open the Astro FIle Manager App on your phone and tap the Google Ears APK file to install it.

7. After the installation process has finished, reboot your smartphone.


There you go ! You have successfully installed the Google Ears App on your smartphone. Now, you can add the Ears widget on your homescreens as you would normally add other widgets.


Sunday, 22 July 2012

Install All the Jelly Bean Apps on your Android Device


Android’s latest version Jelly Bean has pleased all the Android Fans by bringing some great new apps that were not present in the previous versions of Android. The apps have been extracted from the Jelly Bean ROM and they are now available to be flashed on any Android device running on the Ice Cream Sandwich. If you are running ICS on your smartphone, then head on to the following procedure to see how you can get almost all the Jelly Bean Apps on your device.


I. Before You Begin:

1. You must have rooted your device before doing this procedure.

2. You must have ClockworkMod Recovery installed on your device.

II. Downloading Required Files:

1. Download the CWM Flashable JB Apps from here. (Download link is in the second post)

2. Download the list of included Apps in the file from here. (Optional)


III. Installing Jelly Bean Apps on your Android Device:

1. Download and place the CWM Flashable JB Apps file onto your Desktop.

2. Connect your device to your PC using the USB cable that came with it.

3. Transfer the JB Apps file to the root folder of your device’s SD card.

4. After you have successfully transferred the file, disconnect your device from the PC.

5. Turn OFF your device using the Power button.

6. Reboot your device into the ClockworkMod Recovery. You need to find the key combination to enter ClockworkMod Recovery from the ClockworkMod Installation procedure for your device.

7. Once you are in the recovery mode, choose install zip from sdcard followed by choose zip from sdcard.

8. Navigate to the JB Apps File which you transferred to your device earlier and select it for flashing using the Power button.

9. It will take a while to install all the Apps. Once it’s done, choose reboot system now from the recovery menu.


Your device will reboot and when it boots up, you will see all the Jelly Bean Apps right in the Menu of your phone. Check out all the apps in there and let us know how they are.